
Table of Contents
Introduction
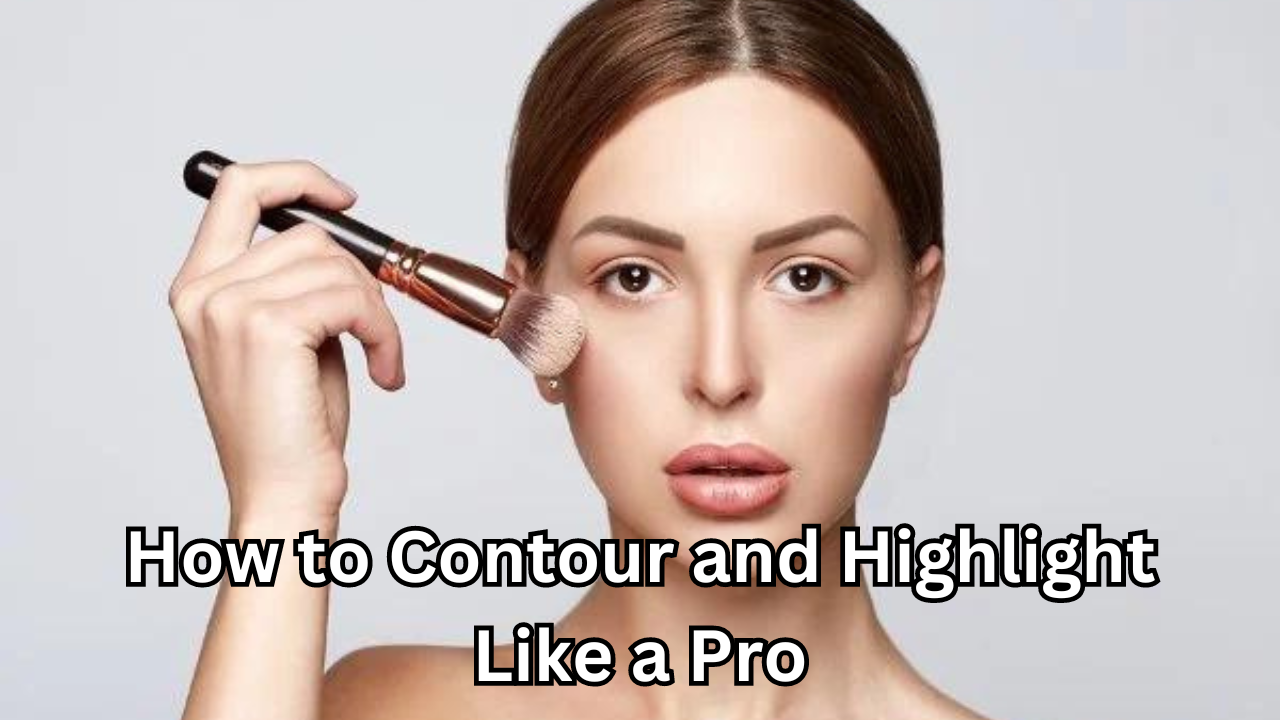
Contouring and highlighting are essential techniques in makeup artistry that can transform your appearance by sculpting and illuminating your face. Contouring involves applying darker shades to create shadows and define facial features, while highlighting uses lighter shades to accentuate high points and add a radiant glow. Together, these techniques enhance your natural features, offering a sculpted and polished look.
Understanding how to contour and highlight effectively is crucial for achieving a balanced and professional makeup application. These techniques can help accentuate cheekbones, define the jawline, and brighten up areas of the face, making your makeup appear flawless and well-defined. Whether you’re preparing for a special occasion or aiming for a daily polished look, mastering contouring and highlighting can significantly elevate your beauty routine.
Understanding Your Face Shape
Identifying your face shape is the first step in perfecting your fashion contouring and highlighting techniques. Different face shapes require specific approaches to enhance their natural contours and create a balanced look. Here’s a guide to the most common face shapes and how to tailor your fashion contouring and highlighting to each one:
Oval Face Shape
- Characteristics: An oval face is well-proportioned with a slightly narrower chin and forehead. The length of the face is about one and a half times the width.
- Contouring Techniques: Oval faces generally require minimal contouring since their proportions are already balanced. Apply contour along the sides of your forehead and jawline to subtly enhance the natural shape. You may also contour under your cheekbones for a bit of definition.
- Highlighting Techniques: Focus on highlighting the tops of your cheekbones, brow bones, and the bridge of your nose to emphasize your natural features.
Round Face Shape
- Characteristics: A round face has equal width and length, with full cheeks and a rounded chin.
- Contouring Techniques: To add definition and create the illusion of a more elongated face, contour along the sides of the cheeks, under the chin, and along the sides of the forehead. This will help to slim and shape the face.
- Highlighting Techniques: Highlight the center of your forehead, the tops of your cheekbones, and the center of your chin to draw attention to the high points and balance the roundness.
Square Face Shape
- Characteristics: A square face has a strong, angular jawline and a broad forehead, with equal width across the forehead, cheeks, and jawline.
- Contouring Techniques: To soften the angularity, contour along the sides of the forehead, the jawline, and under the cheekbones. This will help to round out the sharp angles and create a more sculpted look.
- Highlighting Techniques: Highlight the center of the forehead, the tops of the cheekbones, and the bridge of the nose to add a soft glow and draw attention to the center of the face.
Heart Face Shape
- Characteristics: A heart-shaped face has a wider forehead and cheekbones with a narrower chin and jawline.
- Contouring Techniques: Contour along the sides of the forehead and the edges of the jawline to balance the wider upper face with the narrower lower part. Apply contour under the cheekbones to create a more defined structure.
- Highlighting Techniques: Focus on highlighting the tops of the cheekbones, the center of the forehead, and the bridge of the nose to accentuate the upper features and create harmony with the narrower chin.
By understanding your face shape and applying these tailored contouring and highlighting techniques, you can enhance your natural features and achieve a more balanced and defined appearance. Experimenting with different techniques and adjusting based on your preferences will help you find the perfect look for your unique face shape.
Choosing the Right Products
Selecting the right contouring and highlighting products is essential for women aiming to achieve a flawless and professional finish. Here’s a breakdown of the types of products available and how to choose the best ones for your skin tone and needs:
Types of Contouring Products
- Powder: Contouring powders are ideal for those with oily skin or who prefer a matte finish. They offer buildable coverage and can be easily blended to create a soft, natural look. They work well for everyday use and are great for creating both subtle and dramatic contours.
- Cream: Cream contour products provide a more intense color payoff and a dewy finish. They are suitable for dry to normal skin types and can offer a more seamless blend when warmed up with your fingers or a brush. Cream contours are excellent for creating a sculpted look with rich pigmentation.
- Stick: Contour sticks combine the ease of application with a creamy texture. They are portable and convenient, allowing for precise application. Stick contours are versatile and can be used for both natural and bold looks. They work well for quick touch-ups and on-the-go makeup.
Types of Highlighting Products
- Powder: Highlighter powders are great for adding a luminous glow with a soft, buildable finish. They are suitable for all skin types and can be layered for a more intense shine. Powder highlighters are perfect for achieving a radiant look that can be easily blended and adjusted.
- Cream: Cream highlighters provide a dewy and natural glow, which is ideal for dry or mature skin types. They blend effortlessly with foundation and contour products, offering a seamless finish. Cream highlighters can be applied directly to the skin or mixed with foundation for a subtle radiance.
- Liquid: Liquid highlighters offer a lightweight, intense glow that can be built up for a high-impact shine. They are ideal for creating a dewy, luminous finish and are often used for a more dramatic effect. Liquid highlighters can be applied with fingers, brushes, or sponges and are great for a fresh, glowing look.
Selecting Shades and Formulas for Different Skin Tones
- Contour Shades: Choose contour shades that are 1-2 shades darker than your natural skin tone. For fair skin, opt for cool-toned taupe shades. Medium skin tones can use neutral to warm browns, while deeper skin tones should go for rich, warm chocolate shades.
- Highlight Shades: Select highlighter shades that complement your skin tone. Fair skin looks best with pale pinks or cool champagne hues. Medium skin tones can choose golds or peach tones, while deep skin tones can go for bronze or rich gold shades.
Essential Tools for Contouring and Highlighting
Brushes and Sponges: Types and Uses
- Brushes:
- Angled Brush: Ideal for precise contouring along the cheekbones and jawline. The angled shape allows for accurate application and blending.
- Fan Brush: Perfect for applying highlighter to the tops of the cheekbones and brow bones. The fan shape helps in diffusing the product for a soft, even glow.
- Blending Brush: Useful for blending contour and highlight seamlessly. A fluffy blending brush can help diffuse harsh lines and create a natural finish.
- Sponges:
- Beauty Sponge: Great for blending cream and liquid products. The sponge’s texture allows for a smooth, airbrushed finish, making it ideal for both contouring and highlighting.
- Contour Sponge: Some sponges are specifically shaped for contouring, with angled edges to help apply and blend contour products with precision.
How to Choose the Right Tool for the Application
- Consider Product Type: Match your tools with the type of product you’re using. Powders work well with brushes, while creams and liquids blend effortlessly with sponges.
- Application Needs: For detailed contouring, use brushes with precise shapes. For overall blending and a seamless finish, opt for sponges that can cover larger areas and soften lines.
- Personal Preference: Experiment with different tools to find what feels most comfortable and effective for you. Some may prefer brushes for precise application, while others might find sponges better for blending.
By choosing the right products and tools tailored to your skin type and makeup needs, you can achieve professional results and enhance your contouring and highlighting techniques. Experimenting with different products and tools will help you find the perfect combination for your unique look.
Certainly! Here’s a detailed section on preparation and base makeup, as well as contouring techniques:
Preparation and Base Makeup
Importance of a Well-Prepped Canvas
- Cleansing: Proper cleansing is crucial for removing any impurities, oil, or leftover makeup from your skin. A clean canvas ensures that your contouring and highlighting products adhere better and blend more smoothly. Use a gentle cleanser suited to your skin type to start your makeup routine.
- Moisturizing: Hydrated skin provides a smooth surface for makeup application. Applying a moisturizer helps to plump up the skin and minimize the appearance of fine lines and pores. Choose a moisturizer that suits your skin type—lightweight for oily skin and richer formulations for dry skin.
- Priming: A primer creates a barrier between your skin and makeup, helping to smooth the surface and improve the longevity of your makeup. It can also help to control oil, minimize pores, and even out the skin texture. Apply a primer suited to your skin concerns, focusing on areas where makeup tends to break down or settle into lines.
Applying Foundation and Concealer as a Base
- Foundation: Apply your foundation evenly across your face to create a uniform base. Use a brush, sponge, or fingers to blend it out, ensuring that it seamlessly covers your skin and provides a smooth backdrop for contouring and highlighting. Choose a foundation that matches your skin tone and undertone for the best results.
- Concealer: Apply concealer to areas that need extra coverage, such as under the eyes, around the nose, and on any blemishes or redness. Use a shade that is slightly lighter than your foundation for brightening under the eyes and neutralizing discoloration. Blend the concealer well with your foundation to create an even base.
Contouring Techniques
Step-by-Step Guide to Contouring the Cheekbones, Jawline, and Nose
- Cheekbones:
- Apply Contour: Using a contour powder, cream, or stick, apply the product in the hollows of your cheeks. To find the hollows, make a “fish face” and follow the natural indentation.
- Blend: Use a contour brush or sponge to blend the contour upward towards your temples. This creates the illusion of higher, more defined cheekbones.
- Jawline:
- Apply Contour: Apply contour along your jawline, starting from the middle of your chin and blending outward towards your ears. This helps to define the jaw and create a more sculpted look.
- Blend: Blend the contour well to avoid harsh lines, ensuring a natural transition between your jawline and neck.
- Nose:
- Apply Contour: Apply contour along the sides of your nose, from the bridge down to the tip. Use a thin, precise brush or pencil for accurate application.
- Highlight: Apply highlighter down the center of your nose to accentuate the bridge and create a more elongated appearance.
- Blend: Blend the contour and highlight to ensure a smooth and natural look, avoiding any stark lines.
Tips for Creating Natural-Looking Shadows
- Use Buildable Products: Start with a light hand and build up the intensity gradually. This helps in creating a more natural look and prevents over-application.
- Blend, Blend, Blend: Blending is key to achieving a seamless contour. Use clean brushes or sponges to blend out any harsh lines and create a smooth gradient.
- Match the Contour with Your Facial Structure: Follow your natural bone structure and use contour to enhance, not change, your features. This will ensure that your contouring looks more realistic.
Common Mistakes to Avoid
- Applying Too Much Product: Over-applying contour or highlight can lead to an unnatural appearance. Start with a small amount of product and build as needed.
- Using the Wrong Shades: Ensure that your contour shades are a few shades darker than your skin tone and that your highlight shades are complementary to avoid a mismatched look.
- Not Blending Properly: Harsh lines can make contouring look artificial. Always blend your contour and highlight to achieve a seamless, natural finish.
- Ignoring Face Shape: Tailor your contouring to your specific face shape. Applying contour in areas not suited to your face shape can disrupt the intended effect.
By following these preparation steps and contouring techniques, you can create a well-defined, sculpted look that enhances your facial features and complements your overall makeup. Practice and patience are key to perfecting these techniques, so take your time to experiment and find what works best for you.
Highlighting Techniques
Step-by-Step Guide to Highlighting the Cheekbones, Brow Bones, and Cupid’s Bow
- Cheekbones:
- Apply Highlighter: Using a highlighter brush or your fingers, apply highlighter to the tops of your cheekbones. Start from the highest point of the cheekbone and blend outwards towards your temples.
- Blend: Gently blend the highlighter into your foundation and contour to ensure a smooth transition and avoid any harsh lines.
- Brow Bones:
- Apply Highlighter: Apply highlighter just below your brow bone, focusing on the arch of the eyebrow. This will lift and open up the eye area.
- Blend: Use a small, precise brush to blend the highlighter with your eyeshadow and skin, creating a seamless glow.
- Cupid’s Bow:
- Apply Highlighter: Apply highlighter to the center of your cupid’s bow, the area just above your upper lip.
- Blend: Blend the highlighter into your lip color or foundation to enhance the fullness of your lips and create a natural shine.
Tips for Achieving a Natural Glow
- Choose the Right Shade: Select a highlighter that complements your skin tone. For a natural glow, opt for shades that enhance your natural undertones rather than contrasting them.
- Apply Sparingly: Start with a small amount of highlighter and build up as needed. Too much product can lead to an artificial shine.
- Layer Wisely: For a subtle glow, apply a light layer of highlighter. For a more intense effect, you can layer additional product but blend thoroughly.
Common Mistakes to Avoid
- Over-Application: Applying too much highlighter can make your skin look greasy or unnatural. Less is often more when it comes to achieving a natural glow.
- Ignoring Skin Texture: Highlighting can accentuate texture. Ensure your skin is well-moisturized and smooth before applying highlighter to avoid emphasizing imperfections.
- Poor Blending: Highlighting should blend seamlessly with your foundation and contour. Avoid harsh lines by blending well.
Blending Techniques
Importance of Blending for a Seamless Look
- Achieving a Natural Finish: Proper blending ensures that contour and highlight are not applied in isolated patches but merge seamlessly with your foundation. This helps to create a natural, polished look and avoids any stark lines or uneven patches.
- Creating Dimension: Blending helps in creating a natural gradient between your contour and highlight, which enhances the dimension of your face and makes the makeup appear more lifelike.
Tools and Techniques for Effective Blending
- Tools:
- Blending Brush: Use a fluffy, rounded brush for blending contour and highlight. The soft bristles help to diffuse the product and create a smooth transition.
- Beauty Sponge: A damp beauty sponge is ideal for blending cream and liquid products. Its texture helps in pressing the product into the skincare routine and achieving a flawless finish.
- Techniques:
- Circular Motions: Use gentle, circular motions to blend contour and highlight. This technique helps to soften harsh lines and integrate the products with your foundation.
- Upward Strokes: For contouring, blend upwards towards the temples to lift the face. For highlighting, blend downwards and outwards to achieve a natural glow.
Setting Your Contour and Highlight
Best Setting Powders and Sprays to Lock in Your Makeup
- Setting Powders: Choose translucent or color-matched setting powders to set your makeup without altering the color. Powders help to mattify the skin and lock in contour and highlight.
- Loose Powder: Ideal for setting your entire face, including areas with contour and highlight. It provides a light, breathable finish.
- Pressed Powder: Convenient for touch-ups and controlling shine throughout the day. It’s also effective for setting targeted areas.
- Setting Sprays: Use a setting spray to lock in your makeup and ensure it lasts all day. Look for sprays that offer a dewy finish for added glow or a matte finish for oil control.
Tips for Maintaining Longevity Throughout the Day
- Apply a Light Layer: Avoid heavy application of setting powders. A light layer is sufficient to set your makeup while maintaining its natural look.
- Blotting Papers: Keep blotting papers on hand to control oil and shine without disrupting your contour and highlight.
- Touch-Up: Carry a small amount of setting powder or spray for quick touch-ups throughout the day to refresh your makeup and keep it looking flawless.
By mastering highlighting techniques, effective blending, and proper setting, you can achieve a polished and enduring makeup look that enhances your natural beauty. Practice these techniques to find what works best for your skin and makeup style.
Day vs. Night Contouring and Highlighting
Adjusting Techniques for Different Lighting and Occasions
- Daytime Look: For a natural and subtle daytime look, focus on soft contouring and highlighting. The goal is to enhance your features without appearing overly made-up. Use matte or satin finish contouring products and choose highlighters that give a soft glow rather than a high shine. In natural daylight, a more understated approach ensures that your makeup looks fresh and natural.
- Evening Look: For a dramatic evening look, intensify your contouring and highlighting to ensure it stands out under artificial lighting. Use more pigmented contour products to create deeper shadows and highlight products with shimmer or metallic finishes to catch the light. Layer your products for a more pronounced effect that complements the evening ambiance and ensures your makeup remains striking throughout the night.
Tips for a Subtle Daytime Look vs. a Dramatic Evening Look
- Daytime:
- Contour Lightly: Apply contour in light layers to avoid a heavy appearance. Focus on the natural hollows of your cheeks and lightly contour the jawline.
- Highlight Softly: Choose a subtle highlighter with a natural sheen and apply it to the high points of your face for a fresh glow.
- Blend Well: Ensure all products are well-blended to achieve a smooth, natural finish.
- Evening:
- Contour Intensely: Use deeper contour shades to create pronounced shadows on your cheekbones, jawline, and nose. Don’t be afraid to build up the contour for a more sculpted look.
- Highlight Boldly: Opt for highlighters with shimmer or glitter for an eye-catching effect. Apply it generously on the tops of your cheekbones, brow bones, and cupid’s bow.
- Layer and Build: Layer contour and highlight products to achieve a striking effect that holds up under evening lighting.
Contouring and Highlighting for Different Skin Types
Adapting Techniques for Oily, Dry, and Combination Skin
- Oily Skin:
- Contour and Highlight: Use powder-based contouring and highlighting products to avoid adding extra moisture. Set your makeup with a mattifying setting powder to control shine throughout the day.
- Technique: Focus on contouring and highlighting areas prone to oiliness to reduce the chance of makeup breakdown. Avoid overly creamy products that can exacerbate oiliness.
- Dry Skin:
- Contour and Highlight: Cream and liquid contour and highlight products work best for dry skin, as they provide a dewy finish and blend seamlessly. Ensure your skin is well-moisturized before applying these products.
- Technique: Apply contour and highlight with a light hand and blend thoroughly to avoid emphasizing dry patches or texture.
- Combination Skin:
- Contour and Highlight: Use a mix of powder and cream products based on your skin’s needs. Apply powder to oilier areas and cream products to drier areas.
- Technique: Adapt your technique to focus on areas where your skin type changes. For example, use powder contour on the T-zone and cream highlight on the drier parts of your face.
Product Recommendations for Each Skin Type
- Oily Skin: Look for powder contours and highlighters, such as the NARS Laguna Bronzer for contouring and Becca Shimmering Skin Perfector for highlighting.
- Dry Skin: Opt for cream or liquid products like the Fenty Beauty Match Stix for contouring and Charlotte Tilbury Hollywood Flawless Filter for highlighting.
- Combination Skin: Use versatile products such as the Anastasia Beverly Hills Contour Kit (which includes both powder and cream options) and Benefit Watt’s Up! Highlighter for a balanced approach.
Troubleshooting Common Issues
Fixing Harsh Lines and Uneven Application
- Harsh Lines: To fix harsh contour lines, use a clean blending brush or sponge to soften the edges. Blend in gentle, circular motions to diffuse any visible lines and achieve a seamless transition.
- Uneven Application: If your contour or highlight is uneven, apply a bit of foundation or concealer over the affected areas and blend it out. This will help to even out the application and create a more uniform look.
Tips for Correcting Mistakes and Achieving Balance
- Over-Contouring: If you’ve over-applied contour, use a damp sponge to blend it out and tone down the intensity. Apply a light layer of foundation over the top if needed.
- Excess Highlight: If your highlight is too intense, gently pat the area with a clean brush or sponge to blend it in and reduce the shine. You can also use a bit of translucent powder to tone it down.
- Balancing Contour and Highlight: Ensure that your contour and highlight are well-balanced by comparing both sides of your face. If one side appears more pronounced, blend and adjust accordingly for symmetry.
By mastering these techniques and tips, you can tailor your contouring and highlighting to suit any occasion and skin type, while ensuring a flawless and balanced look. Practice and experimentation will help you refine your skills and achieve the perfect contour and highlight for every situation.
Contouring and Highlighting for Different Skin Tones
Choosing the Right Shades for Light, Medium, and Dark Skin Tones
- Light Skin Tones:
- Contour: Choose contour shades that are a few shades darker than your natural skin tone. Soft taupe or cool brown tones work well to create a subtle shadow without appearing too harsh.
- Highlight: Opt for highlighters with a champagne or pearl finish. These shades enhance the natural glow of lighter skin tones without overpowering them.
- Medium Skin Tones:
- Contour: Select contour shades that are a bit deeper, such as warm brown or caramel tones. These shades create definition and dimension without looking too stark.
- Highlight: Gold or rose gold highlighters complement medium skin tones beautifully. They add warmth and radiance that blend well with your skin.
- Dark Skin Tones:
- Contour: Choose contour shades that are rich and deep, like dark brown or ebony. These shades create strong contrast and definition against darker skin tones.
- Highlight: Highlighters with rich gold or bronze tones enhance dark skin beautifully. These shades provide a luminous glow that stands out against darker complexions.
Adjusting Techniques for Various Undertones
- Cool Undertones: For cool undertones, choose contour and highlight products with a cool or neutral base. Cool-toned contour shades and pink or pearl highlighters complement cool undertones and create a harmonious look.
- Warm Undertones: Opt for warm contour shades like caramel or bronze, and warm highlighters with gold or peach tones. These colors enhance the warmth of your skin and create a cohesive appearance.
- Neutral Undertones: Neutral undertones can work with a range of contour and highlight shades. Choose contour shades that match your natural depth and highlighters in champagne or soft gold for a balanced glow.
Advanced Techniques
Techniques for More Sculpted Looks
- Nose Contouring:
- Apply Contour: Use a thin, precise contour brush to apply contour along the sides of your nose. Focus on the bridge and sides to create the illusion of a slimmer nose.
- Highlight: Apply highlighter down the center of the nose to emphasize its length and add brightness. Blend well to avoid harsh lines.
- Blend: Use a small blending brush or sponge to seamlessly blend contour and highlight, ensuring a natural, sculpted effect.
- Jawline Sharpening:
- Apply Contour: Apply contour along your jawline and under your chin. This technique helps to define the jaw and create a more chiseled appearance.
- Blend: Blend the contour well to avoid a stark contrast between the jawline and neck. Use upward strokes to blend the contour into the neck area.
- Highlight: Apply a subtle highlight along the center of your neck and chin to create a balanced and smooth transition.
Tips from Professional Makeup Artists
- Use Light Layers: Professional makeup artists often use light layers of contour and highlight to build up the desired intensity gradually. This approach helps in achieving a more natural and refined look.
- Focus on Light and Shadow: Pay attention to how light naturally falls on your face. Contour where shadows naturally occur and highlight where light hits. This technique enhances the natural contours of your face and avoids an artificial appearance.
- Custom Blend Products: Mix different contour and highlight products to create custom shades that perfectly match your skin tone and undertone. This can help in achieving a more personalized and natural finish.
- Set and Maintain: Use a setting spray or powder to lock in your contour and highlight. This helps in maintaining the look throughout the day and ensures it withstands various lighting conditions.
By selecting the right shades for your skin tone and mastering advanced techniques, you can achieve a perfectly sculpted and radiant look. Experiment with different products and techniques to find what works best for your unique features and style.
Conclusion
In summary, contouring and highlighting are powerful techniques that can transform your appearance, enhancing your natural features and creating a flawless, sculpted look. By understanding your face shape, choosing the right products, and adapting techniques to your skin tone and type, you can achieve a makeup application that enhances your beauty and suits any occasion.
To recap, here are the key points:
- Understanding Your Face Shape: Tailor your contouring and highlighting to accentuate the unique features of your face shape, whether it’s oval, round, square, or heart-shaped.
- Choosing the Right Products: Select contouring and highlighting products that match your skin tone and type. Use powders for oily skin and creams for dry skin, and ensure you choose shades that complement your undertones.
- Preparation and Application: Prepare your skin with proper cleansing, moisturizing, and priming. Apply foundation and concealer as a base before expertly contouring and highlighting key areas to define and enhance your features.
- Advanced Techniques: Experiment with techniques like nose contouring and jawline sharpening for a more sculpted look. Utilize professional tips for blending and setting to perfect your makeup application.
Contouring and highlighting are both an art and a science. Don’t be afraid to practice and experiment with different products and techniques to find what works best for you. The more you practice, the more adept you will become at creating a flawless, radiant look that enhances your natural beauty.
Remember, makeup is a creative expression and there are no strict rules. Feel free to explore and adjust techniques to match your personal style and preferences. Embrace the journey of discovering what makes you look and feel your best.