
Table of Contents
Introduction
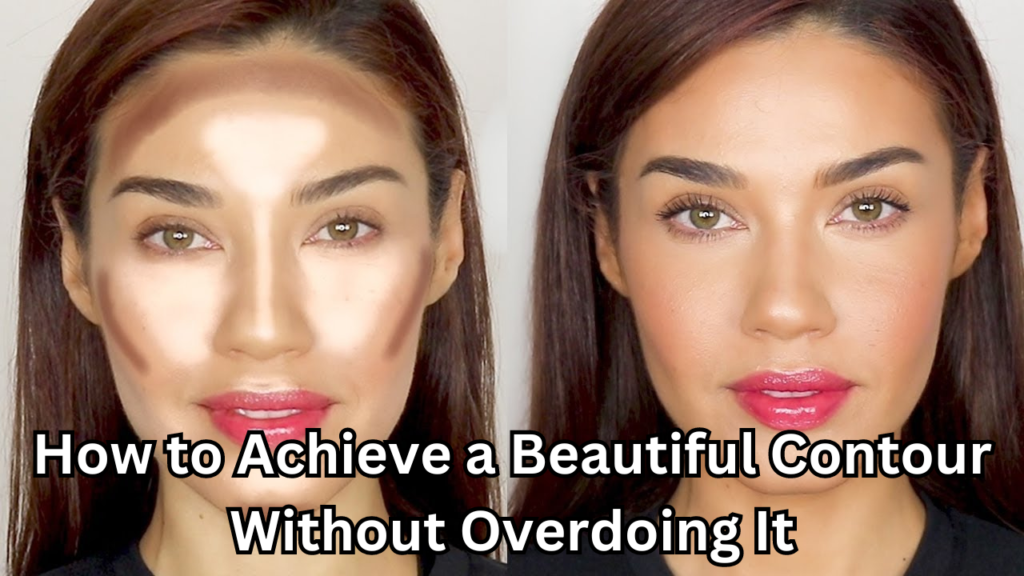
Beautiful contour has become a central technique in modern makeup routines, celebrated for its ability to enhance and sculpt facial features with precision. Originating from professional makeup artistry, contouring has transcended to become a staple in everyday beauty routines. Its popularity stems from its transformative power, enabling individuals to accentuate their bone structure and create a polished, refined look. However, the art of contouring is not just about dramatic changes or bold contrasts. The true mastery lies in achieving a natural, Beautiful Contour that complements one’s features without overpowering them. The goal is to enhance and define while maintaining an effortless, understated elegance. A well-executed contour should seamlessly blend into the skin, highlighting the natural beauty rather than masking it. In this article, we will explore how to achieve a beautifully subtle contour that enhances your features gracefully, avoiding the common pitfalls of overdoing it. Whether you’re new to contouring or looking to refine your technique, understanding the principles of a natural contour will help you achieve a balanced, flawless finish.
Understanding Beautiful Contour
Contouring is a makeup technique designed to enhance and define the structure of the face by using makeup to create shadows and highlights. This method involves applying darker shades to areas you want to recede and lighter shades to areas you wish to bring forward, thus sculpting and shaping the face to achieve a desired look. While contouring has gained a reputation for its dramatic effects, its fundamental purpose is to subtly enhance the natural makeup structure, adding depth and dimension.
Contouring vs. Highlighting
It’s essential to distinguish between contouring and highlighting, as both techniques work in tandem to create a balanced and refined appearance. Contouring involves using darker shades to create shadows and define features such as the cheekbones, jawline, and nose. These shades are typically a few tones darker than your natural skin tone, designed to simulate natural shadows on the face.
Highlighting, on the other hand, involves applying lighter shades or shimmery products to the high points of the face where light naturally hits, such as the tops of the cheekbones, the bridge of the nose, and the cupid’s bow. This technique adds brightness and a luminous glow, drawing attention to these elevated areas.
Benefits of Subtle Contouring for Everyday Looks
Subtle contouring offers several advantages, especially for everyday makeup routines:
- Enhances Natural Features: A soft contour can enhance the natural bone structure of the face without appearing overdone, providing a refined look that enhances rather than masks your features.
- Versatility: Subtle contouring is versatile and suitable for various occasions, from professional settings to casual outings. It provides a polished appearance that adapts well to different environments.
- Effortless Elegance: A gentle contour can add definition and dimension to the face while maintaining an effortless and elegant appearance. It’s ideal for those who prefer a more understated approach to makeup.
- Enhances Facial Balance: By strategically applying contour and highlight, you can create a harmonious balance on your face, improving overall symmetry and enhancing natural women beauty.
Incorporating subtle contouring into your routine can elevate your makeup look with minimal effort, offering a natural and graceful enhancement that complements your everyday style.
Choosing the Right Products
Selecting the right contouring products and tools is crucial for achieving a seamless and natural look. Here’s a breakdown of the options available and how to choose the best ones for your needs:
Types of Beautiful Contour Products
- Powders: Powder contour products are popular for their ease of use and blendability. They work well for those with oily skin or those who prefer a matte finish. Powder contours are usually applied with angled brushes and can be built up gradually for a more defined look. They are also ideal for setting makeup in place.
- Creams: Cream contour products provide a more dewy finish and are great for dry or combination skin types. They blend effortlessly into the skin and offer a more natural appearance. Cream contours are usually applied with fingers or makeup sponges and can be layered for added intensity.
- Sticks: Contour sticks are versatile and convenient, offering precise application with their built-in applicators. They can be used for both cream and powder contouring, depending on the formulation. Stick contours are ideal for on-the-go use and are easy to apply directly to the skin before blending.
Selecting the Right Shades for Your Skin Tone
Choosing the right shades is key to achieving a natural contour. Here’s how to find the best shades for your skin tone:
- Contour Shade: Opt for a contour shade that is one to two shades darker than your natural skin tone. For lighter skin tones, choose cool or neutral tones, while deeper skin tones can go for warmer shades. Avoid shades that are too dark, as they can create harsh lines and look unnatural.
- Highlight Shade: Select a highlighter that is one to two shades lighter than your skin tone. For a natural glow, choose a shade that complements your skin’s undertones. Luminous highlighters can add a radiant finish without looking too sparkly or exaggerated.
Importance of Quality Brushes and Tools
The right tools can make a significant difference in the outcome of your contouring:
- Brushes: Quality brushes are essential for precise application and seamless blending. For contouring, use angled brushes for precise application along the cheekbones and jawline, and fluffy brushes for blending. A small, tapered brush can be used for contouring the nose and other detailed areas.
- Sponges: Makeup sponges, especially those with a tapered edge, are excellent for blending cream and liquid contours. They help achieve a smooth, airbrushed finish by blending the product seamlessly into the skin.
- Blending Tools: Proper blending tools are crucial for avoiding harsh lines and creating a natural look. Invest in high-quality blending brushes and sponges to ensure your contour looks flawless and well-integrated with the rest of your makeup.
By choosing the right products and tools, you can achieve a beautifully sculpted look that enhances your features while maintaining a natural appearance.
Preparation and Base Makeup
Creating a flawless contour starts with a well-prepared base. The steps you take before applying contouring products can significantly impact the final result, ensuring that your contour looks smooth and natural. Here’s how to prepare your skin and apply base makeup effectively:
Importance of a Clean and Moisturized Face
A clean and moisturized face is essential for a smooth and even application of contouring products. Proper skin preparation helps to:
- Enhance Makeup Longevity: Clean skin free from excess oils and impurities allows makeup to adhere better and last longer throughout the day.
- Create a Smooth Canvas: Moisturizing your skin helps to fill in fine lines and create a smooth surface, making it easier to apply and blend contour products.
Start with a gentle cleanser to remove any impurities or residual makeup from your skin. Follow up with a moisturizer suited to your skin type to ensure your skin is hydrated and supple. This step helps prevent contour products from clinging to dry patches and ensures a more even application.
Applying Primer for a Smooth Base
A primer is a crucial step in achieving a flawless contour. It creates a smooth base for your makeup, helping to blur imperfections and extend the wear of your products. Here’s why primer is important:
- Minimizes Pores: A good primer helps to fill in pores and create a more even texture, which enhances the overall appearance of your contour.
- Improves Makeup Adherence: Primer allows foundation and contour products to adhere better, reducing the likelihood of creasing or shifting throughout the day.
Apply a pea-sized amount of primer to your face, focusing on areas where you have larger pores or uneven texture. Use your fingers or a brush to gently spread the primer in an even layer, allowing it to set for a few moments before proceeding with foundation.
Foundation and Concealer Application Tips
Foundation and concealer form the foundation of your base makeup, providing an even canvas for contouring. Follow these tips for a flawless application:
- Foundation: Choose a foundation that matches your skin tone for a seamless look. Apply it using a brush, sponge, or your fingers, starting from the center of your face and blending outwards. Ensure the foundation is well-blended along your jawline and hairline to avoid harsh lines.
- Concealer: Use concealer to brighten and correct areas that need extra coverage, such as under the eyes and around the nose. Apply a shade that is slightly lighter than your foundation to highlight these areas. Blend the concealer well to avoid any visible lines or patches.
- Blending: Blending is key to achieving a smooth and natural base. Use a damp makeup sponge or a brush to blend foundation and concealer seamlessly into your skin, ensuring there are no streaks or visible lines.
By following these preparation steps, you’ll create a well-prepped base that sets the stage for a beautifully contoured look. Properly cleaned, moisturized, and primed skin ensures that your contouring products apply smoothly and blend effortlessly, resulting in a flawless and natural finish.
Techniques for Subtle Contouring
Achieving a beautifully subtle contour requires precise application and blending techniques. Here’s a guide to contouring key areas of your face, blending seamlessly, and using the right approach to build up your contour gradually.
Mapping Out the Face: Key Areas to Contour
Contouring involves accentuating certain areas of the face to create a natural, sculpted look. Here’s how to map out and beautiful contour the key areas:
- Cheekbones: To define your cheekbones, apply contour below the cheekbone starting from the ear and extending towards the middle of your cheek. This technique creates a shadow that enhances the prominence of your cheekbones. Make sure to blend the contour upwards towards your hairline for a seamless transition.
- Jawline: To define the jawline, apply contour along the jawbone. Start from the ears and blend contour downwards towards your neck. This helps to create a sharper, more defined jawline. Blend well to avoid a stark line between your jaw and neck.
- Nose: For a more defined nose, apply contour along the sides of your nose, starting from the bridge and blending down towards the nostrils. Use a small, tapered brush for precise application. Blend the contour along the sides and use a highlighter on the bridge of the nose to enhance the contrast.
- Forehead: To reduce the appearance of a larger forehead, apply contour along your hairline. This will create the illusion of a smaller forehead. Blend the contour into your hairline to avoid any visible lines.
Blending Techniques for a Natural Finish
Blending is crucial to achieving a natural-looking contour. Here’s how to blend your contour for a seamless finish:
- Use a Light Hand: Start by applying a small amount of contour product to avoid over-application. It’s easier to build up than to remove excess product.
- Blend Outwards: When blending, use a clean brush or sponge to blend the contour outwards and upwards. This ensures that the contour transitions smoothly into your foundation, creating a natural gradient.
- Circular Motions: Use circular motions to blend the contour, especially around the edges, to avoid harsh lines. This technique helps to diffuse the product evenly and create a soft, natural look.
- Layer Gradually: Build up the contour gradually by adding small amounts of product and blending thoroughly before adding more. This prevents overdoing it and helps to achieve a more controlled and subtle effect.
Using Light Strokes and Building Up Gradually
The key to a subtle contour is to use light strokes and build up the product gradually. Here’s how to achieve this:
- Light Strokes: Apply contour with light strokes to avoid creating heavy or harsh lines. Use a light hand and build up intensity as needed. This approach allows for more control and a more natural result.
- Layering: Start with a light application of contour product and gradually add more if needed. Allow each layer to blend thoroughly before applying additional product. This prevents the contour from looking too intense and ensures a gradual build-up.
By following these techniques, you can create a subtle, natural contour that enhances your features without overwhelming your look. Precision in mapping out key areas, blending thoroughly, and building up product gradually ensures that your contour complements your natural beauty and results in a polished finish.
Highlighting to Complement Contouring
Highlighting is an essential part of contouring, adding luminosity and dimension to the face. Proper highlighting not only enhances the contours but also ensures a balanced and radiant look. Here’s how to select the right highlighter shade, highlight key areas effectively, and blend seamlessly with contouring for a flawless finish.
Selecting the Right Highlighter Shade
Choosing the right highlighter shade is crucial for achieving a natural and complementary glow. Here’s how to select the perfect shade for your skin tone:
- Skin Tone Considerations:
- Fair Skin: Opt for highlighters with a pink or pearl undertone. These shades add a subtle, cool glow that complements lighter skin tones.
- Medium Skin: Choose highlighters with a peach or champagne undertone. These shades provide a warm, radiant glow that enhances medium skin tones.
- Dark Skin: Go for highlighters with a gold or bronze undertone. These shades offer a rich, luminous finish that complements deeper skin tones.
- Formulation: Highlighters come in various formulations, including powders, creams, and liquids. Choose a formulation that suits your preference and skin type. Creams and liquids can provide a dewy finish, while powders offer a more subtle, matte glow.
Key Areas to Highlight for a Balanced Look
Highlighting the right areas of your face enhances your contour and creates a balanced, radiant appearance. Focus on these key areas:
- Cheekbones: Apply highlighter to the tops of your cheekbones, where light naturally hits. This adds a radiant glow and accentuates your cheekbones, complementing your contour.
- Bridge of the Nose: Apply a light layer of highlighter down the bridge of your nose. This adds dimension and draws attention to the center of your face.
- Brow Bones: Highlighting the area just below your brow bone lifts and brightens the eyes, making them appear more awake and defined.
- Cupid’s Bow: Apply highlighter to the Cupid’s bow (the area above your upper lip) to enhance the shape of your lips and add a subtle glow.
- Forehead Center: For a luminous finish, lightly highlight the center of your forehead. This adds a touch of glow and complements the contour applied to your hairline.
Blending Highlighter with beautiful contour for a Seamless Transition
To achieve a natural and cohesive look, blending highlighter with contour is essential. Here’s how to ensure a seamless transition:
- Blend Lightly: Use a clean brush or makeup sponge to blend the highlighter with the contour. Apply gentle pressure to avoid disrupting the contour and to ensure a smooth transition between highlighted and contoured areas.
- Avoid Harsh Lines: Make sure the highlighter and contour blend into each other without visible lines. The goal is to create a smooth gradient where the contour adds definition, and the highlighter adds radiance.
- Layer Gradually: Start with a light application of highlighter and build up the intensity gradually. This prevents over-application and ensures a more controlled and natural finish.
- Check in Natural Light: To ensure a seamless blend, check your makeup in natural light. This will help you spot any unevenness and make necessary adjustments for a more balanced look.
By selecting the right highlighter shade, applying it to key areas, and blending it seamlessly with contour, you can achieve a radiant, balanced look that enhances your features beautifully. Proper highlighting complements contouring, adding a glowing dimension that makes your makeup look effortlessly polished and natural.
Common Mistakes to Avoid
Contouring and highlighting can transform your look when done correctly, but common mistakes can lead to less-than-ideal results. Here’s a guide to avoiding these pitfalls and achieving a flawless contour:
Over-Applying Product
One of the most common mistakes in contouring is over-applying product. Excessive contour or highlighter can lead to a harsh or unnatural appearance. To avoid this:
- Start Small: Begin with a small amount of product and build up gradually. It’s easier to add more if needed than to remove excess.
- Blend Thoroughly: Ensure that you blend the contour and highlighter well to avoid stark lines. The goal is to create a seamless transition between the different areas of your face.
- Check for Build-Up: After applying and blending, check in natural light to ensure there are no areas where the product looks overly heavy.
Using the Wrong Shades for Your Skin Tone
Choosing the incorrect shades for contour and highlighter can disrupt the natural look you’re aiming for. Here’s how to select the right shades:
- Contour Shade: Choose a contour shade that is one to two shades darker than your skin tone. Avoid shades that are too dark or too light, as they can create unnatural contrasts.
- Highlighter Shade: Select a highlighter that complements your skin tone. For instance, cooler tones work well with fair skin, while warmer tones are better for medium to dark skin.
- Test Products: Always test contour and highlighter shades in natural light to see how they work with your skin tone before applying them to your face.
Not Blending Properly
Improper blending is a major cause of uneven or unnatural contouring. To achieve a smooth, blended look:
- Use the Right Tools: Invest in good-quality brushes and sponges designed for contouring and highlighting. These tools can help you achieve a more seamless blend.
- Blend in Layers: Apply contour and highlighter in layers, blending each layer before applying more product. This ensures a gradual and natural look.
- Check for Seamless Transitions: Make sure the contour and highlighter blend smoothly into your foundation without visible lines or patches.
Ignoring the Natural Light and Shadows on Your Face
Contouring and highlighting should complement the natural structure of your face. Ignoring the natural light and shadows can lead to an artificial look:
- Observe Natural Shadows: Pay attention to the natural shadows on your face, such as under your cheekbones and along your jawline. Apply contour in these areas to enhance your natural bone structure.
- Highlight Natural High Points: Highlight areas where light naturally hits, such as the tops of your cheekbones and the bridge of your nose, to enhance your natural glow.
- Check in Natural Light: Always check your makeup in natural light to ensure that the beautiful contour and highlight look natural and harmonious.
By avoiding these common mistakes, you can achieve a beautifully contoured and highlighted look that enhances your features naturally and gracefully. Proper application, blending, and attention to your skin tone and natural light will help you create a flawless, radiant finish.
Practice and Refinement
Perfecting the art of contouring and highlighting requires time, practice, and a willingness to refine your technique. By dedicating effort to mastering these skills, you can achieve a beautifully sculpted look tailored to any occasion. Here’s how to approach practice and refinement:
Importance of Practice for Perfecting the Technique
Contouring and highlighting are techniques that benefit greatly from hands-on practice. The more you practice, the more you will understand how to apply products effectively and create the desired effect. Here’s why practice is essential:
- Develops Skill: Regular practice helps you develop the muscle memory needed for precise application and blending. You’ll become more adept at using different tools and products to achieve a flawless finish.
- Increases Confidence: As you practice, you’ll gain confidence in your technique, making it easier to experiment with different looks and styles.
- Enhances Results: Practice allows you to understand the nuances of your face shape and how to contour it effectively. Over time, you’ll be able to achieve a more natural and polished appearance.
Adjusting the Contour for Different Occasions (Daytime vs. Evening Looks)
Contouring can be adapted to suit different occasions, from everyday wear to special evening events. Here’s how to adjust your contouring technique:
- Daytime Looks: For a natural daytime look, opt for a subtle contour and highlight. Use light strokes and blend thoroughly to create a soft, effortless appearance. Choose neutral shades that enhance your features without appearing too dramatic.
- Evening Looks: For evening or special occasions, you can amp up the contour and highlight for a more defined and striking look. Apply contour and highlighter with slightly more intensity, and use richer shades to create more definition and dimension. This approach helps your makeup stand out under different lighting conditions, such as artificial light or flash photography.
Seeking Feedback and Refining Your Approach
Feedback and continuous refinement are crucial for improving your contouring technique. Here’s how to seek feedback and refine your approach:
- Ask for Input: Seek feedback from friends, family, or makeup professionals. Their observations can provide valuable insights into what works well and what might need adjustment.
- Review Photos: Take photos of your makeup in different lighting conditions to assess how well your contour and highlight look. This can help you identify any areas that need improvement and ensure a balanced appearance.
- Experiment and Adjust: Don’t be afraid to experiment with different techniques and products. Adjust your approach based on what you learn from practice and feedback, and continue to refine your technique until you achieve your desired results.
By embracing practice and actively seeking feedback, you can perfect your contouring and highlighting skills. Adjusting your technique for different occasions and refining your approach will ensure that your makeup always looks polished and suited to the moment, whether you’re going for a subtle day look or a dramatic evening style.
Recommended Products and Tools
Choosing the right products and tools is crucial for achieving a flawless contour. Whether you’re looking for high-end options, quality tools, or affordable choices for beginners, here’s a comprehensive guide to help you select the best products for your contouring needs:
List of High-Quality beautiful contour Products for Various Skin Types
- Powder Contours:
- Too Faced Chocolate Soleil Matte Bronzer: A popular choice for its smooth application and buildable coverage, suitable for various skin tones.
- NARS Laguna Bronzer: Offers a natural tan and subtle shimmer, great for adding warmth and definition.
- Cream Contours:
- Anastasia Beverly Hills Contour Cream Kit: Provides a range of shades with a creamy texture that blends easily for a natural finish.
- Fenty Beauty Match Stix Matte Skinstick: Comes in multiple shades and has a creamy, blendable formula ideal for contouring and highlighting.
- Stick Contours:
- NYX Professional Makeup Wonder Stick: Affordable and versatile, featuring contour and highlight shades in one stick for easy application.
- Charlotte Tilbury Hollywood Contour Wand: Known for its lightweight, blendable formula and radiant finish.
Recommended Brushes and Sponges for Application
- Contour Brushes:
- Real Techniques Sculpting Brush: Features a tapered head for precise contouring along the cheekbones and jawline.
- Sigma Beauty F05 Small Contour Brush: Ideal for detailed contouring, including the nose and under the cheekbones.
- Highlighting Brushes:
- Morphe M501 Pro Pointed Blender Brush: Perfect for applying highlighter to the tops of the cheekbones and brow bones.
- EcoTools Highlighting Fan Brush: Provides a light, airy application of highlighter for a subtle glow.
- Sponges:
- Beautyblender Original: Great for blending contour and highlight seamlessly into the skin.
- Real Techniques Miracle Complexion Sponge: Versatile and effective for applying and blending both cream and powder products.
Affordable Options for Beginners
- Contouring Products:
- e.l.f. Cosmetics Contour Palette: An affordable option with a range of shades to suit different skin tones and contouring needs.
- Maybelline New York FaceStudio Master Contour V-Shape Duo Stick: Combines contour and highlight in one stick, perfect for beginners.
- Brushes:
- Wet n Wild Contour Brush: Budget-friendly and effective for contouring with precision.
- BH Cosmetics Studio Pro Brush Set: Includes a range of brushes suitable for contouring, highlighting, and blending.
- Sponges:
- Real Techniques Miracle Sponge: Affordable and effective for blending contour and foundation.
- Sonia Kashuk Makeup Sponge: A great budget-friendly option for even application and blending.
By selecting the right contour products and tools based on your skin type and budget, you can achieve a beautifully sculpted look with ease. Whether you opt for high-end or affordable options, investing in quality tools and products will enhance your contouring technique and help you achieve professional results.
Conclusion
Beautiful contour is a powerful technique that can enhance your natural features in fashion and create a beautifully sculpted look. However, the key to mastering contouring lies in achieving a subtle, natural effect that complements your unique features. Here’s a recap of the importance of subtle contouring, encouragement to experiment, and final tips for maintaining a natural look:
Recap of the Importance of Subtle Contouring
Subtle contouring is essential for enhancing your features without overwhelming your natural beauty. By applying contour and highlight in moderation, you can achieve a balanced and harmonious look that emphasizes your best features while maintaining a natural appearance. Subtle contouring helps to:
- Accentuate Your Features: Properly applied contour and highlight enhance your facial structure, creating dimension and definition.
- Maintain a Natural Look: Avoiding heavy application ensures that your makeup looks effortless and complements your everyday style.
- Adapt to Different Occasions: Subtle contouring can be adapted for both daytime and evening looks, making it versatile and suitable for various settings.
Encouragement to Experiment and Find What Works Best for Your Unique Features
Contouring is not a one-size-fits-all technique. Every face is unique, and experimenting with different techniques, products, and tools is crucial to finding what works best for you. Here’s how to make the most of your contouring practice:
- Experiment with Techniques: Try different contouring and highlighting techniques to see what enhances your features most effectively. Don’t be afraid to adjust your approach based on your face shape and personal preferences.
- Test Different Products: Explore various products to find the ones that work best for your skin type and tone. From powders to creams to sticks, each formulation offers different benefits.
- Adapt to Your Style: Adjust your contouring approach based on your style and the occasions you’re preparing for. Whether you prefer a subtle day look or a more defined evening appearance, find what makes you feel confident and beautiful.
Final Tips for Maintaining a Natural Look
To ensure that your contouring always looks natural and polished, keep these final tips in mind:
- Blend, Blend, Blend: Thorough blending is key to achieving a seamless transition between contour and highlight. Use quality brushes and sponges to blend products well and avoid harsh lines.
- Check in Natural Light: Always review your makeup in natural light to ensure it looks well-blended and natural. This helps you catch any areas that may need adjustment.
- Build Gradually: Apply contour and highlighter in light layers and build up gradually. This prevents over-application and helps maintain a subtle, natural look.
By embracing these techniques and tips, you can achieve a beautifully contoured look that enhances your features and complements your natural beauty. Contouring is an art that, when done subtly, can highlight your best attributes and create a radiant, confident appearance.